To be deprecated
This guide will be deprecated as User Management v2 is taken into use. See Microsoft Entra ID Authentication Integration.
Edition: SaaS Enterprise
Guide objective:
Follow this guide to configure Microsoft Entra ID (formerly Azure Active Directory) authentication for Agile Data Engine.
Notice:
This document focuses on making authentication integration between Entra ID and Agile Data Engine. Restricting who can access application though integration need to be done on customer side on Entra ID and is out of scope of this documentation. Read User Management chapter and follow Entra ID documentation to configure restrictions according to requirements in your own organization.
Prerequisites
To enable authentication with your Microsoft Entra ID tenant to Agile Data Engine, you will need:
-
Agile Data Engine SaaS Enterprise edition (or higher)
-
One of the following roles on your Microsoft Entra ID tenant to add and configure an enterprise application:
-
Global Administrator
-
Cloud Application Administrator
-
Application Administrator
-
At the moment it is not possible to fully complete setting up the integration without contacting Agile Data Engine support. Follow this guide to create and configure an enterprise application in your Microsoft Entra ID tenant. After completing the configuration, provide the instructed details to Agile Data Engine support.
Create an enterprise application
-
Navigate to Azure Portal and to your Microsoft Entra ID tenant.
-
In Enterprise applications click New application and select Create your own application.
-
Name your application (e.g. Agile Data Engine), select Integrate any other application you don't find in the gallery (Non-gallery) and click Create.
Configure redirect URLs
-
Navigate back to your Microsoft Entra ID tenant and click App registrations.
-
Find the application you created, open it and click Authentication.
-
Click Add a platform, select Web and set Redirect URIs for all environments in the following format:
https://external.{ENVIRONMENT}.datahub.{TENANT}.saas.agiledataengine.com/authenticator/realms/ade/broker/{AD}/endpoint
Where:
-
Replace {AD} with e.g. company name (example: CompanyAD). This naming will guide end users to login to correct AD. Limitations in {AD} naming:
-
No space allowed in the name
-
Name is case sensitive
-
-
Replace {TENANT} with ADE tenant name (example: s1234567). Tenant name is part of the ADE URL.
-
Replace {ENVIRONMENT} with ADE environment name. Environment names are listed in the Designer front page under Environments.
Example:
https://external.design.datahub.s1234567.saas.agiledataengine.com/authenticator/realms/ade/broker/CompanyAD/endpoint
https://external.dev.datahub.s1234567.saas.agiledataengine.com/authenticator/realms/ade/broker/CompanyAD/endpoint
https://external.test.datahub.s1234567.saas.agiledataengine.com/authenticator/realms/ade/broker/CompanyAD/endpoint
https://external.prod.datahub.s1234567.saas.agiledataengine.com/authenticator/realms/ade/broker/CompanyAD/endpoint
4. Set Front-channel logout URL in the following format:
https://external.design.datahub.{TENANT}.saas.agiledataengine.com/authenticator/realms/ade/protocol/openid-connect/logout
For example:
https://external.design.datahub.s1234567.saas.agiledataengine.com/authenticator/realms/ade/protocol/openid-connect/logout
Create an application client secret
-
In Certificates & secrets click New client secret.
-
Set an appropriate expiry time, click add. Store the secret value securely and prepare to share it with Agile Data Engine support.
-
Take note of the expiry date and always plan ahead to update the secret in time.
Token configuration
-
In Token configuration click Add optional claim, select token type ID, select claim upn, click Add.
-
Check box Turn on the Microsoft Graph profile permission in the dialog and click Add.
Share details with Agile Data Engine support
Share the following details securely with Agile Data Engine support:
-
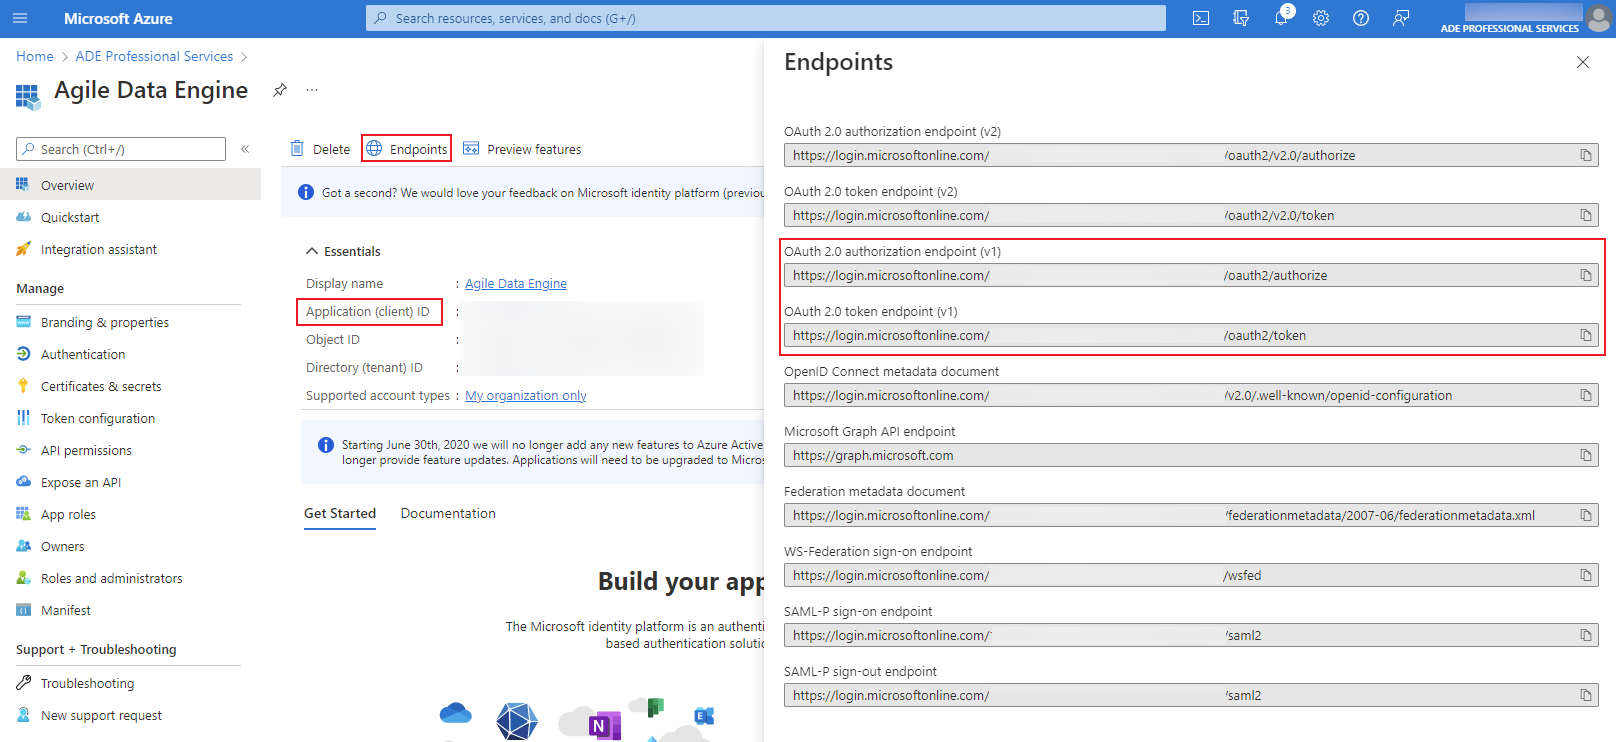
Application (client) ID
-
OAuth 2.0 token endpoint (v1)
-
OAuth 2.0 authorization endpoint (v1)
-
Client secret
-
Configured redirect URIs
For example:
https://external.design.datahub.s1234567.saas.agiledataengine.com/authenticator/realms/ade/broker/CompanyAD/endpoint
https://external.dev.datahub.s1234567.saas.agiledataengine.com/authenticator/realms/ade/broker/CompanyAD/endpoint
https://external.test.datahub.s1234567.saas.agiledataengine.com/authenticator/realms/ade/broker/CompanyAD/endpoint
https://external.prod.datahub.s1234567.saas.agiledataengine.com/authenticator/realms/ade/
You will find these details from the Overview and Endpoints tabs:
Client secret values are only shown immediately after creation. If you did not store the secret, you can always create another one.
After the support team has configured your account for Microsoft Entra ID authentication, users can access Agile Data Engine with their Microsoft Entra ID accounts.
Manage Users
At this point any user in Entra ID can log in to ADE. Restricting access to certain group of users that can access ADE should be done within Entra ID. This is highly recommended because ADE does not have any authorization logic after the user has successfully logged in to ADE.
Follow instructions on Azure documentation to configure user level access to Agile Data Engine application.
https://learn.microsoft.com/en-us/entra/identity-platform/howto-restrict-your-app-to-a-set-of-users
Log in with Microsoft Entra ID
-
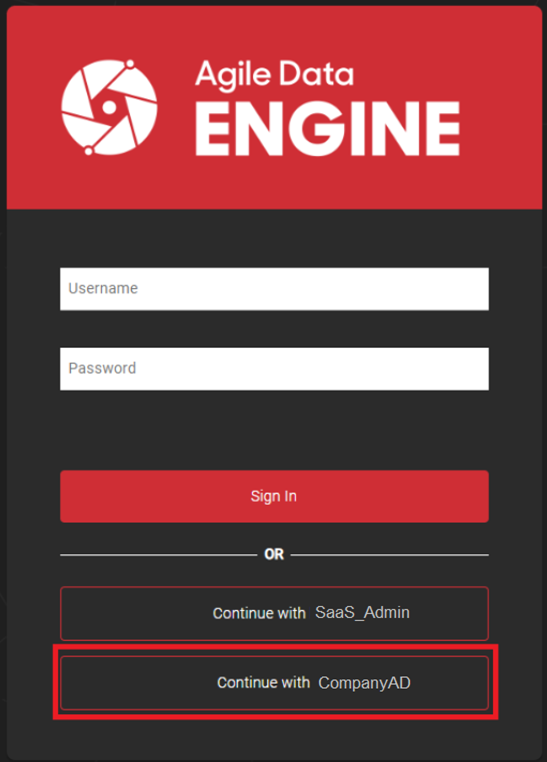
After the configuration is complete, navigate to your Agile Data Engine account and select Continue with CompanyAD:
-
Log in with your Microsoft Entra ID account.