Accessing ADE Private Edition
Edition: Private
Agile Data Engine Private edition services are accessed via an environment specific bastion host. Follow the instructions to create a SOCKS proxy with SSH and configure a browser to tunnel connections through the proxy to the services. Also see the Managing users in ADE Private guide.
Prerequisites
Requirement | Description |
|---|---|
Bastion user | A username must be added to the bastion hosts with your public key. Each Design/Runtime environment has a separate bastion host. |
Private key | The matching private key is needed for SSH public key authentication. |
Allowed IP address | Connections must be done from a network that can reach the bastion hosts. Allowed IPs are set in the Agile Data Engine main configuration in the installation process. |
Bastion public IP | Find out the public IP addresses of the bastion hosts. These should be listed in your private documentation; Agile Data Engine installation process writes the IPs in file main.json. |
Private service URLs | Find out the private addresses of Agile Data Engine services. These should be listed in your private documentation; Agile Data Engine installation process writes the URLs in file main.json. Design environment:
Runtime environments:
|
SSH client | An SSH client capable of creating local forwarding SOCKS proxy connections to the bastion hosts is required (e.g. PuTTY). |
Browser | A browser that can be configured to use a proxy is required (e.g. Google Chrome). |
Setting up a SOCKS proxy
There are multiple ways to set this up. Use the method most suitable for your environment, see examples for step-by-step instructions.
In Mac/Linux you can simply use an ssh command, for example:
ssh -D 12345 -f -i privatekey.pem -N username@123.123.123.123Where:
-D 12345 defines localhost port 12345 as a SOCKS proxy. Choose any free port, use a different port for each bastion tunnel.
-f sends SSH to the background.
-i privatekey.pem defines the path to the private key file.
-N instructs to only forward ports and not to execute any remote commands.
username is your username configured to the bastion host.
123.123.123.123 is the public IP address of the bastion host. Bastion IPs should be listed in your private documentation; Agile Data Engine installation process writes the IPs in file main.json.
Configuring a browser to access the services
Browser proxy settings vary between browsers. It is recommended to define the browser settings with command line options to start the browser in a custom session instead of configuring the settings as default. If the settings are configured as default, the browser profile cannot be used for other purposes. See examples for step-by-step instructions.
Configure the selected localhost port as a SOCKS5 proxy, for example:
127.0.0.1:12345
Open the browser and navigate to the private URL of an Agile Data Engine service, see examples in the table:
Service | Environment | AWS example | Azure example |
|---|---|---|---|
Designer | Design | http://internal-design-1234567890.eu-central-1.elb.amazonaws.com/modeler | http://10.146.17.67 |
Deployment management | Design | http://internal-design-1234567890.eu-central-1.elb.amazonaws.com/jenkins | http://10.146.17.68 |
Dashboard | Design | http://internal-design-1234567890.eu-central-1.elb.amazonaws.com/grafana | http://10.146.17.69 |
Workflow orchestration | Runtime | http://internal-runtime-prod-1234567890.eu-central-1.elb.amazonaws.com/dagger | http://10.146.19.66 |
Dashboard | Runtime | http://internal-runtime-prod-1234567890.eu-central-1.elb.amazonaws.com/grafana | http://10.146.19.67 |
Note that in Azure the URLs are internal IP addresses from the CIDR blocks defined per environment in Agile Data Engine main configuration.
Private service URLs should be listed in your private documentation; Agile Data Engine installation process writes the URLs in file main.json.
Examples
Accessing ADE with PuTTY and Chrome on Windows
This example uses PuTTY as the SSH client and Google Chrome as the browser. Chrome proxy settings are configured in a shortcut target so that they are specific for the sessions opened with that shortcut and do not affect other use of Chrome.
Set up the SSH connections first. Create separate connections to the bastion hosts of all your environments by following these steps:
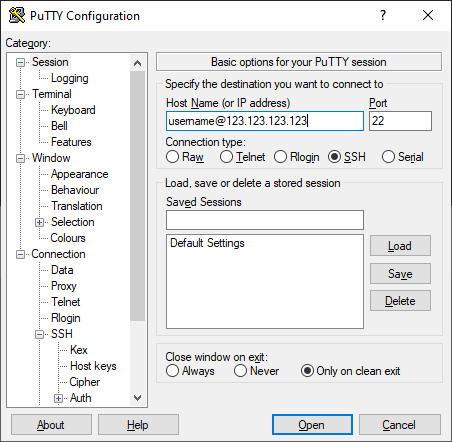
Open PuTTY and create a new session. Enter your username and the bastion IP address as Host Name (or IP address):
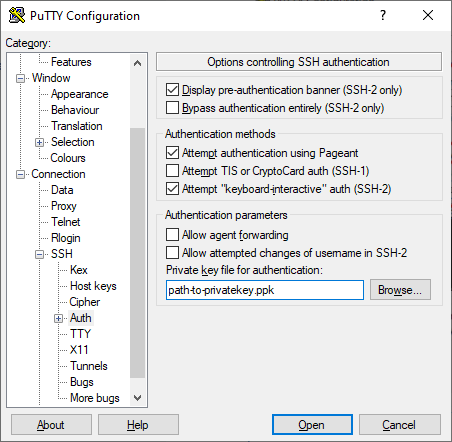
In the SSH - Auth menu select your private key file in .ppk format with Browse. If your private key is in .pem format, convert first it to .ppk e.g. with PuTTYgen.
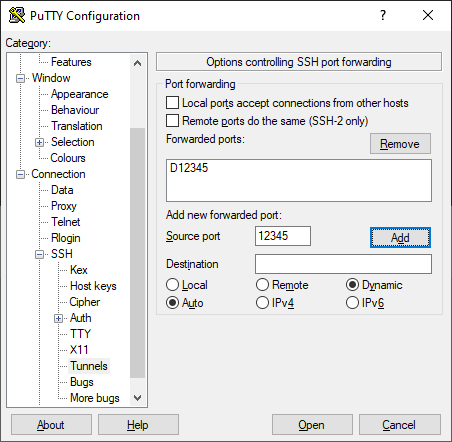
In the SSH - Tunnels menu enter a Source port (any free port, use different port per bastion), select Dynamic and press Add:
Go back to Session, give a session name in Saved Sessions and press Save. Note that Open opens the connection and closes PuTTY configuration. Unsaved session configurations are not stored
Next, create a Chrome shortcut for each service:
Right-click - New - Shortcut.
Enter the following as the target:
"%ProgramFiles(x86)%\Google\Chrome\Application\chrome.exe" --proxy-server=socks5://127.0.0.1:{PORT} --user-data-dir=%TEMP%\chrome-proxy-ade-{ENVIRONMENT} --no-first-run {URL}
Where:
--proxy-server configures the Chrome to use the SOCKS5 proxy.
{PORT} is the port used for the SOCKS proxy.
--user-data-dir defines a directory where the browser stores the user profile. This is necessary so that profile data is not mixed with the default installation. Replace {ENVIRONMENT} with the environment name so that all environments will have a separate temp folder.
--no-first-run skips first run tasks such as asking if the browser should be set as default.
{URL} is the private service URL that will be opened by the browser.
For example:
"%ProgramFiles(x86)%\Google\Chrome\Application\chrome.exe" --proxy-server=socks5://127.0.0.1:12345 --user-data-dir=%TEMP%\chrome-proxy-ade --no-first-run http://internal-design-1234567890.eu-central-1.elb.amazonaws.com/modeler
3. Give a name for the shortcut and press Finish.
4. Open the tunnel with PuTTY and use the shortcut to access the service.
Accessing ADE with SSH and Chrome on Mac
This example uses an ssh command in Mac Terminal for the SSH connection and Google Chrome as a browser. Chrome proxy settings are configured in command line options so that they are specific for the session and do not affect other use of Chrome.
Set up the SSH connections first. Create separate connections to the bastion hosts of all your environments by running ssh commands as instructed in chapter Setting up a SOCKS proxy.
Next, execute Chrome with:
/Applications/Google\ Chrome.app/Contents/MacOS/Google\ Chrome --proxy-server=socks5://127.0.0.1:{PORT} --user-data-dir=/tmp/chrome-proxy-ade-{ENVIRONMENT} --no-first-run {URL}
Where:
--proxy-server configures the Chrome to use the SOCKS5 proxy.
{PORT} is the port used for the SOCKS proxy.
--user-data-dir defines a directory where the browser stores the user profile. This is necessary so that profile data is not mixed with the default installation. Replace {ENVIRONMENT} with the environment name so that all environments will have a separate temp folder.
--no-first-run skips first run tasks such as asking if the browser should be set as default.
{URL} is the private service URL that will be opened by the browser.